Capstone Project: Week 6, Exploring the Cloud

Hi everyone! Thank you for tuning into Week 6 of my Capstone Project: CI/CD Pipelines. This week focuses on exploring more about Microsoft Azure and working with the pipeline I currently have with OWASP JuiceShop.
In my last blogpost I had wanted to create or find a more suitable application, and while that is my top priority for this next week, I was unable to do so. Unfortunately (or fortunately?), I have been extremely busy with job applications and interviews as well as studying for my midterms.
I am excited to state that I have moved on to the final interview with Amazon and I hope that I will be able to work for them! However, I am not putting all of my eggs in one basket, and I currently have approximately 50 applications out in the wild and I am hoping to get that up to 100 soon. So while I haven't made much progress this week, I promise that I have not been slacking!
Updated on the direction of my Project:
- I have decided to move at least for now to Azure App Service (PaaS) to deploy my application to, even in my final project, and I will explain my rationale in a later section.
- As I will be using PaaS, there is likely little need for learning Ansible at this time, so I will be pushing that lower in my list of priorities.
- For my own knowledge though, I will still probably continue my course in my free time! : )
- I will still probably have a normal virtual machine server running though it will be used for my monitoring software and not Ansible.
Without further delay, let's explore what I have done this week!
Modifying my Pipeline
The first thing I wanted to do this week was mess with Azure Artifacts. I went through an MSLearn tutorial on the Azure Artifacts portion of Azure DevOps and found it interesting, but not suitable for my project as of now.
Microsoft Azure Artifacts allows you to share and consume packages from feeds and registries. These packages can be shared within the same team, within an organization, or publicly, nand include package types such as Npm, Python, Maven, NuGet (.Net), and Universal Packages.
While it may be beneficial in some aspects to my project, there is another type of artifact storage found on Azure Pipelines that I do want to make use of which is known as Pipeline Artifacts. These Pipeline Artifacts are simple results that you want to publish from your pipeline, such as a zipped file or a text file for instance that you can access directly from your pipeline.
The task that is used for this service in Azure DevOps is PublishPipelineArtifact@1.
I wanted to utilize this service to publish my results from my Hadolint Dockerfile tester demonstrated in my last blog post. Unfortunately, doing so was sort of difficult as I did not quite understand how it worked even after reading the documentation and going back through past experiments with it in MSLearn. However, I managed to do it, though I am not exactly proud of my script, but it works, which is what matters!
Script:
 1steps:
 2    - task: CmdLine@2
 3    displayName: hadolint
 4    inputs:
 5        script: "cat $(Build.SourcesDirectory)/Dockerfile | docker run --rm -i -v $(Build.SourcesDirectory)/hadolint.yaml:/.config/hadolint.yaml hadolint/hadolint > $(Build.ArtifactStagingDirectory)/output.txt && cat $(Build.SourcesDirectory)/Dockerfile | docker run --rm -i -v $(Build.SourcesDirectory)/hadolint.yaml:/.config/hadolint.yaml hadolint/hadolint"
 6        workingDirectory: "$(Build.SourcesDirectory)"
 7    continueOnError: false
 8
 9    - task: PublishPipelineArtifact@1
10    inputs:
11        targetPath: $(Build.ArtifactStagingDirectory)
12        artifactName: hadolintOutput
In the above code I utilized the command line task to do the same operation twice, which is the operation to pull down a Docker image of Hadolint, spin up a container of it, and cat into it my Dockerfile. However, you can see that in one command I push the results of it directly into a text file located in the $(Build.ArtifactStagingDirectory) which is the place Microsoft recommends you place files you want to be Artifactorized, though it can be anywhere.
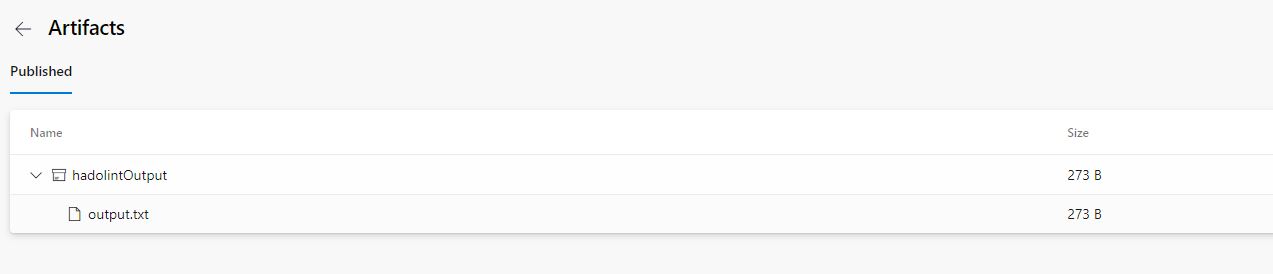
I then ran a task to simply publish the contents of the $(Build.ArtifactStagingDirectory) using the PublishPipelineArtifact@1 task and named the artifact hadolintOutput.
Problems and Resolution
As you can see, this script does not look good, and I definitely want to improve it, but it is not my priority right now. The issue with this is that my knowledge on the structure of Azure Pipelines yaml files is not complete and I simply need more experience to better tackle issues like this. I am 100% positive there is a better way, with one instance being Powershell.
My original idea and test was using Powershell on my local computer to do the same task. I quickly was able to get the results I wanted using the Tee-Object command in Powershell like so:
cat Dockerfile | docker run --rm -i -v C:\Users\Logan\Docker\test2\hadolint.yaml:/.config/hadolint.yaml hadolint/hadolint | Tee-Object -FilePath ./test.txt
But this does not translate well in Azure Pipelines. While I was surprised to see that the command line in Azure DevOps knows how to use cat, it does not know what Tee-Object is as it is a Powershell command. Well, easy resolution, I should just use the PowerShell@2 task that Microsoft has included to do this! Well, not quite. Unfortunately, this task actually takes in a .ps1 file (Powershell Script) as input and not individual commands. While I could have created a Powershell script of my tasks, I decided I just wanted to utilize the command line for now, but this is a viable option for improvement later.
As a result, I was able to run the long && command in the script above and get it to work! However, the PublishPipelineArtifact@1 was giving me an issue. While it was working, in a sense, it ended up pushing my entire repository! After some quick research I figured out that the task by default publishes your entire workspace as a pipeline artifact which included my entire github repo that I import. Soooo, I simply had to paste the file into the $(Build.ArtifactStagingDirectory) and then modify the command to publish only that directory. As a result, I got working Hadolint output text file for future use!
Testing Stage
On a quick note, I also separated Hadolint and WhiteSource Bolt (next section) from the build stage in my script file. My entire script now looks like this:
 1trigger:
 2  - "*"
 3
 4variables:
 5  buildConfiguration: "Release"
 6  webRepository: "juiceshop"
 7  tag: "$(Build.BuildId)"
 8
 9stages:
10  - stage: "Test"
11    displayName: "Testing"
12    jobs:
13      - job: "Test"
14        displayName: "Test Job"
15        pool:
16          vmImage: "ubuntu-20.04"
17        steps:
18          - task: CmdLine@2
19            displayName: hadolint
20            inputs:
21              script: "cat $(Build.SourcesDirectory)/Dockerfile | docker run --rm -i -v $(Build.SourcesDirectory)/hadolint.yaml:/.config/hadolint.yaml hadolint/hadolint > $(Build.ArtifactStagingDirectory)/output.txt && cat $(Build.SourcesDirectory)/Dockerfile | docker run --rm -i -v $(Build.SourcesDirectory)/hadolint.yaml:/.config/hadolint.yaml hadolint/hadolint"
22              workingDirectory: "$(Build.SourcesDirectory)"
23            continueOnError: false
24          - task: WhiteSource@21
25            inputs:
26              projectName: "CapstonePrototype"
27          - task: PublishPipelineArtifact@1
28            inputs:
29              targetPath: $(Build.ArtifactStagingDirectory)
30              artifactName: hadolintOutput
31
32  - stage: "Build"
33    displayName: "Build and push"
34    dependsOn: Test
35    jobs:
36      - job: "Build"
37        displayName: "Build job"
38        pool:
39          vmImage: "ubuntu-20.04"
40        steps:
41          - task: Docker@2
42            displayName: "Build and push the image to container registry"
43            inputs:
44              command: buildAndPush
45              buildContext: $(Build.Repository.LocalPath)
46              repository: $(webRepository)
47              dockerfile: "$(Build.SourcesDirectory)/Dockerfile"
48              containerRegistry: "Container Registry Connection"
49              tags: |
50                                $(tag)
51  - stage: "Deploy"
52    displayName: "Deploy the container"
53    dependsOn: Build
54    jobs:
55      - job: "Deploy"
56        displayName: "Deploy job"
57        pool:
58          vmImage: "ubuntu-20.04"
59        variables:
60          - group: Release
61        steps:
62          - task: AzureWebAppContainer@1
63            inputs:
64              appName: $(WebAppName)
65              azureSubscription: "Resource Manager CapstonePrototype"
66              imageName: $(RegistryName)/$(webRepository):$(build.buildId)
WhiteSource Bolt
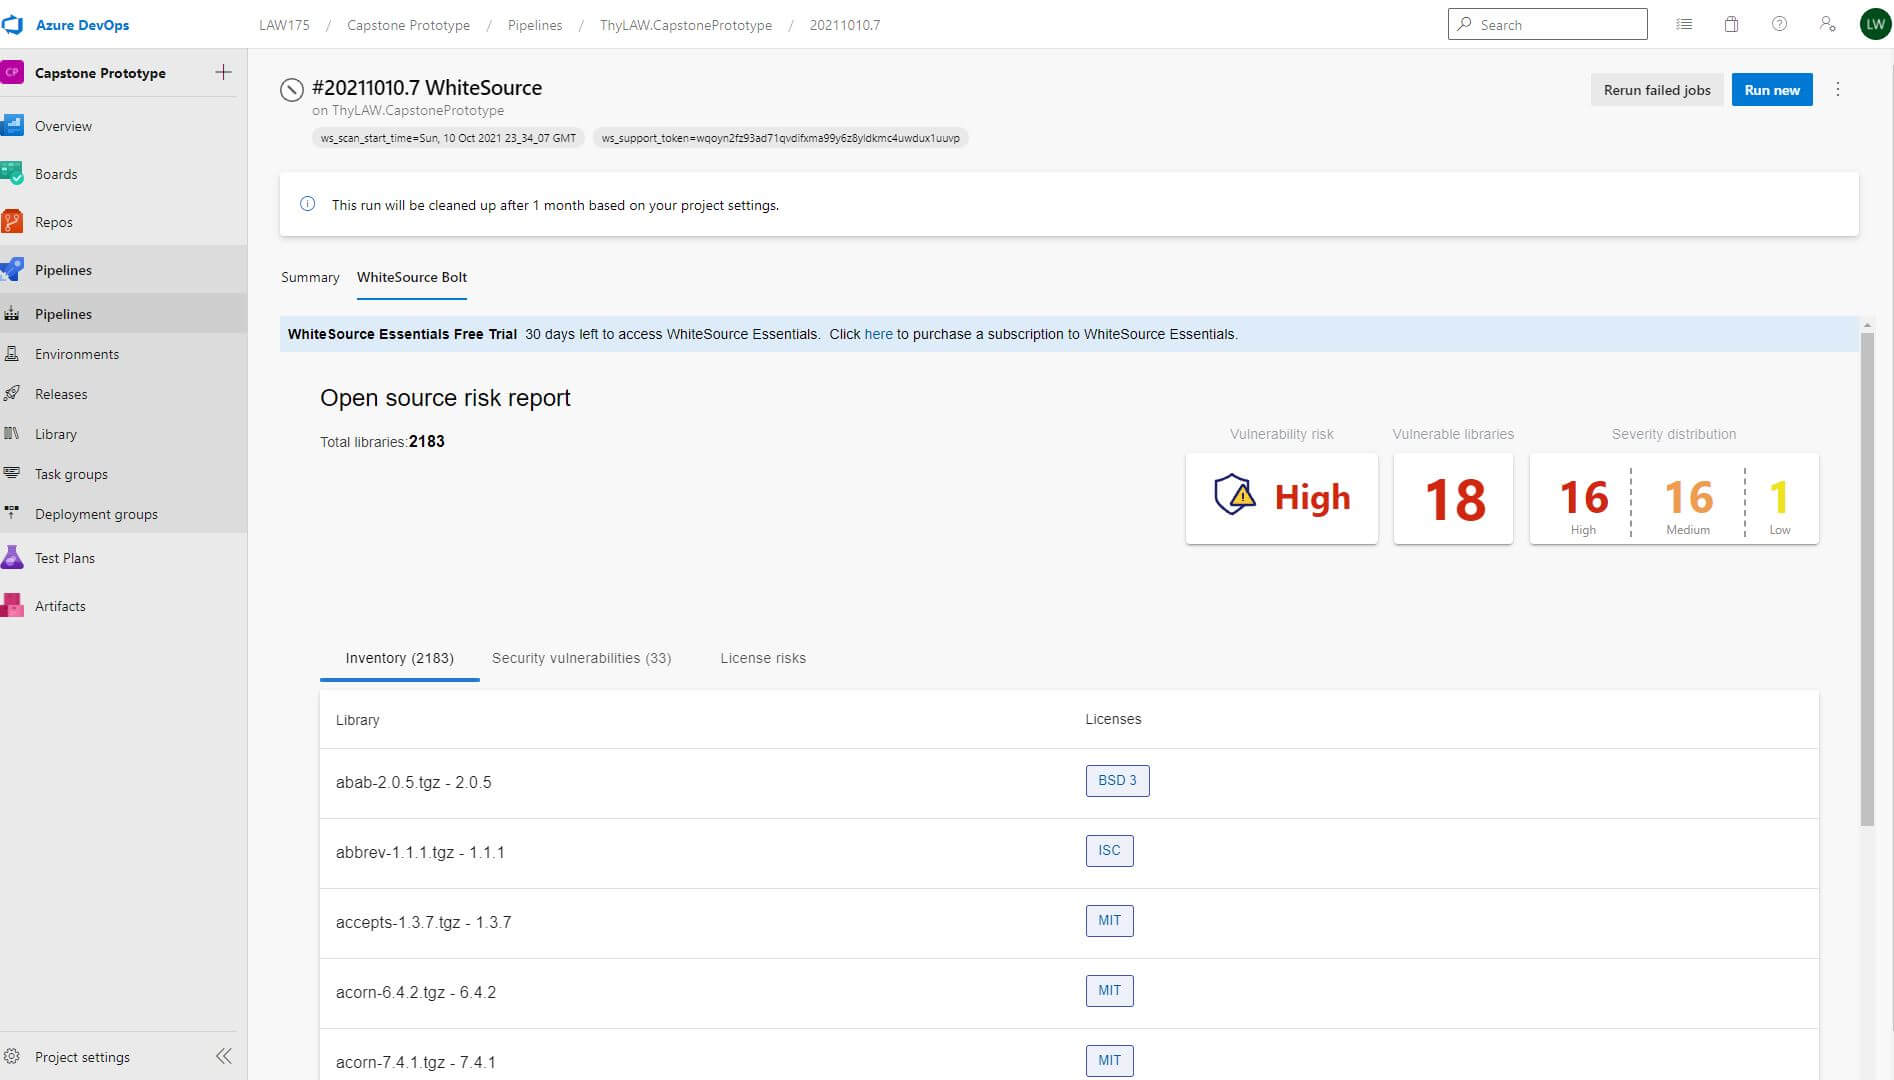
Another feature that is really really cool that I included in my project is WhiteSource Bolt, which is an open source vulnerability scanner that provides quick vulnerability detection and recommended fixes for your applications. As this was a relatively easy install, I won't go into much detail, but this is a really cool feature.
WhiteSource Bolt integrates easily with Azure DevOps or Github and provides their own service for comparing findings to known vulnerabilities. To install, I simply included the following lines in my Test Stage in my azure-pipelines.yml file:
1- task: WhiteSource@21
2   inputs:
3     projectName: "CapstonePrototype"
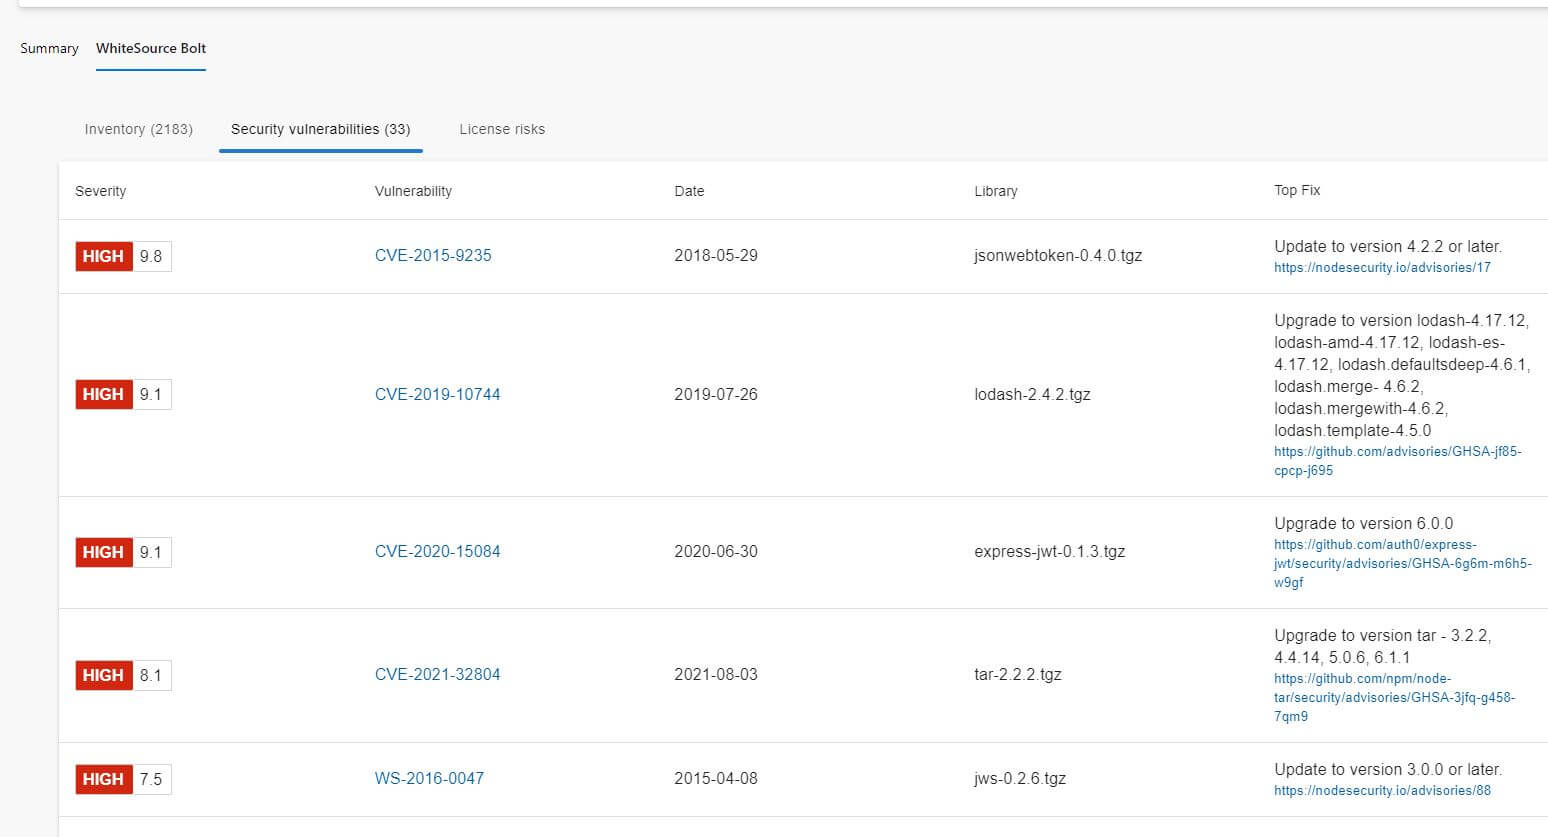
When it runs, the WhiteSource task automatically builds and analyzes all of my files and produces a pretty nifty report!
Unfortunately, this does only have a 30 day trial so this may impact my ability to use it in my final project. On another note, it is also pretty slow, but I don't expect that to be a problem for the application I use for my final project as it will be much smaller.
Exploring Azure App Service
The final thing I want to talk about is my exploration of Microsoft's Azure App Service. As mentioned above, I have decided to move completely to PaaS for this project as there just isn't any real reason to utilize a normal server and it just leads to extra configuration management, potential security issues, and more. I just want to briefly explain some of the benefits I have found when exploring the service for my OWASP JuiceShop App Service Application.
Automatic Scaling
One of the important features of cloud computing is the idea of Rapid Elasticity, which is the idea that organizations can expand their computational power to meet demand when it is high and then lower it when it is low to save costs automatically. This feature is hard to do with normal IaaS, though it is definitely possible. PaaS (and eventually Kubernetes) allows for this pretty much automatically with the flip of a switch!
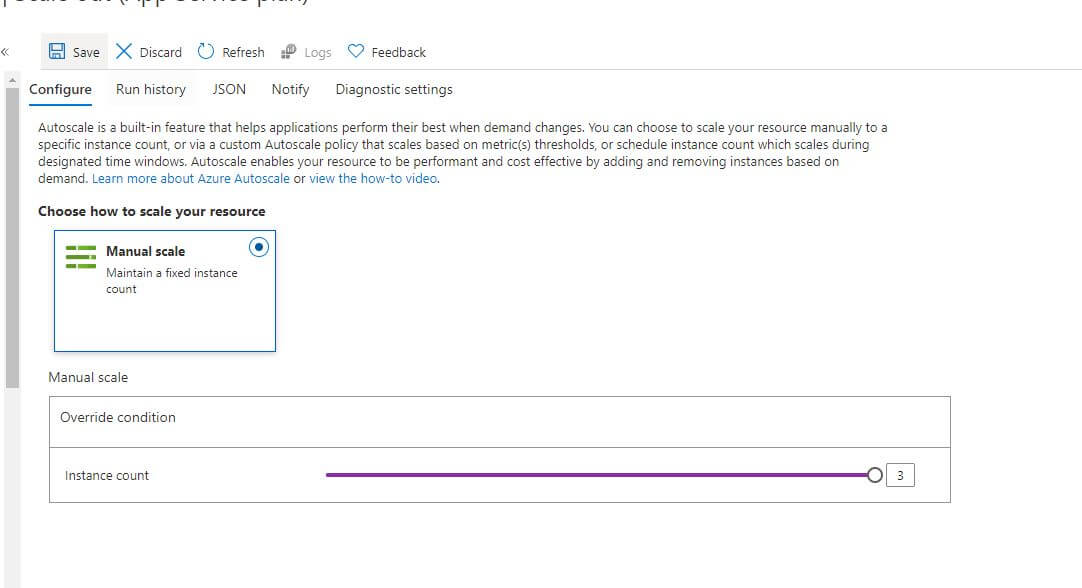
As you can see above, Azure and any other cloud service provider you use allows for the manual or automatic increase and decrease of Application Instances. These are sort of just abstracted servers that the cloud provider manages. While the automatic scaling of instances is not there, it can be enabled based on your tier and when you include a load balancer into your project, as demonstrated here
You can also automatically scale the power of your instances, with groupings such as testing and production which will allow for better performance of your application automatically
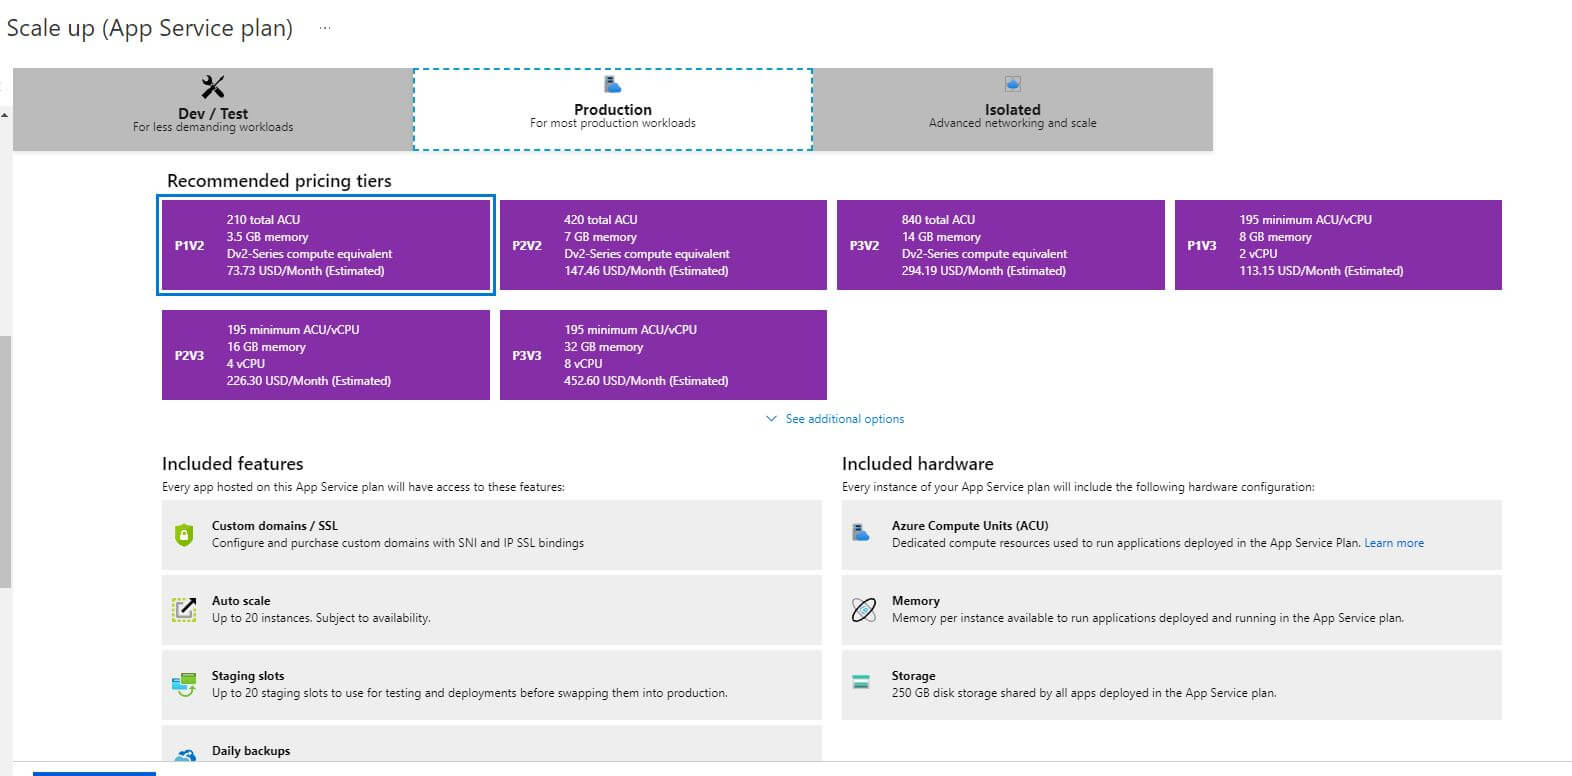
This sounds extremely difficult with configuration management, but it is all done for you here!
Metrics, Insights, and Alerts
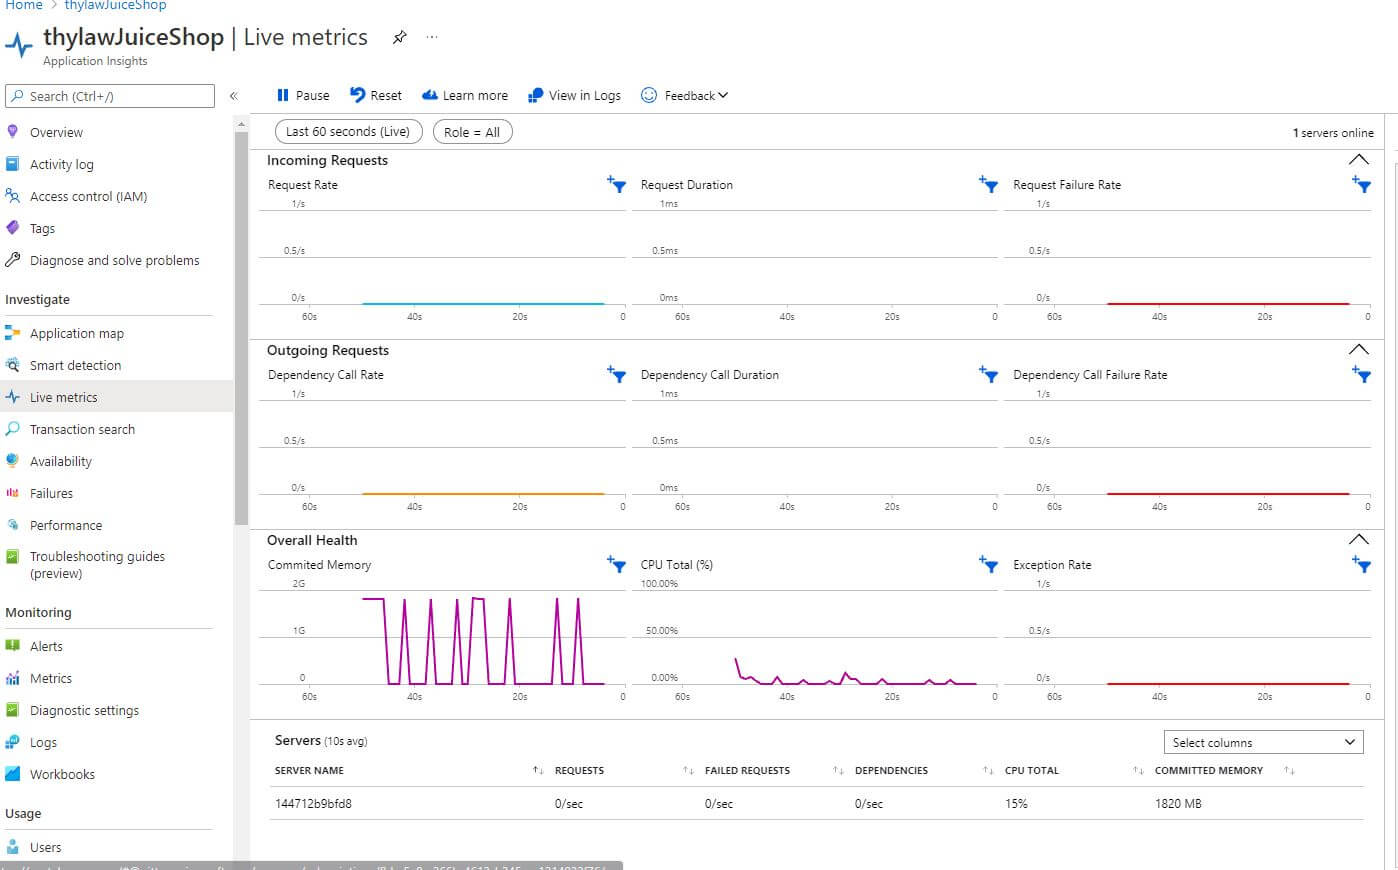
Azure automatically provides tools for health checks, application insights, and alerts based on predefined conditions. This allows someone to have pretty much all of the monitoring they need for their application without having to use any external service.
For example, below is the application insights feature of Azure App Service that gives detailed information about requests to and from your service among many other things.
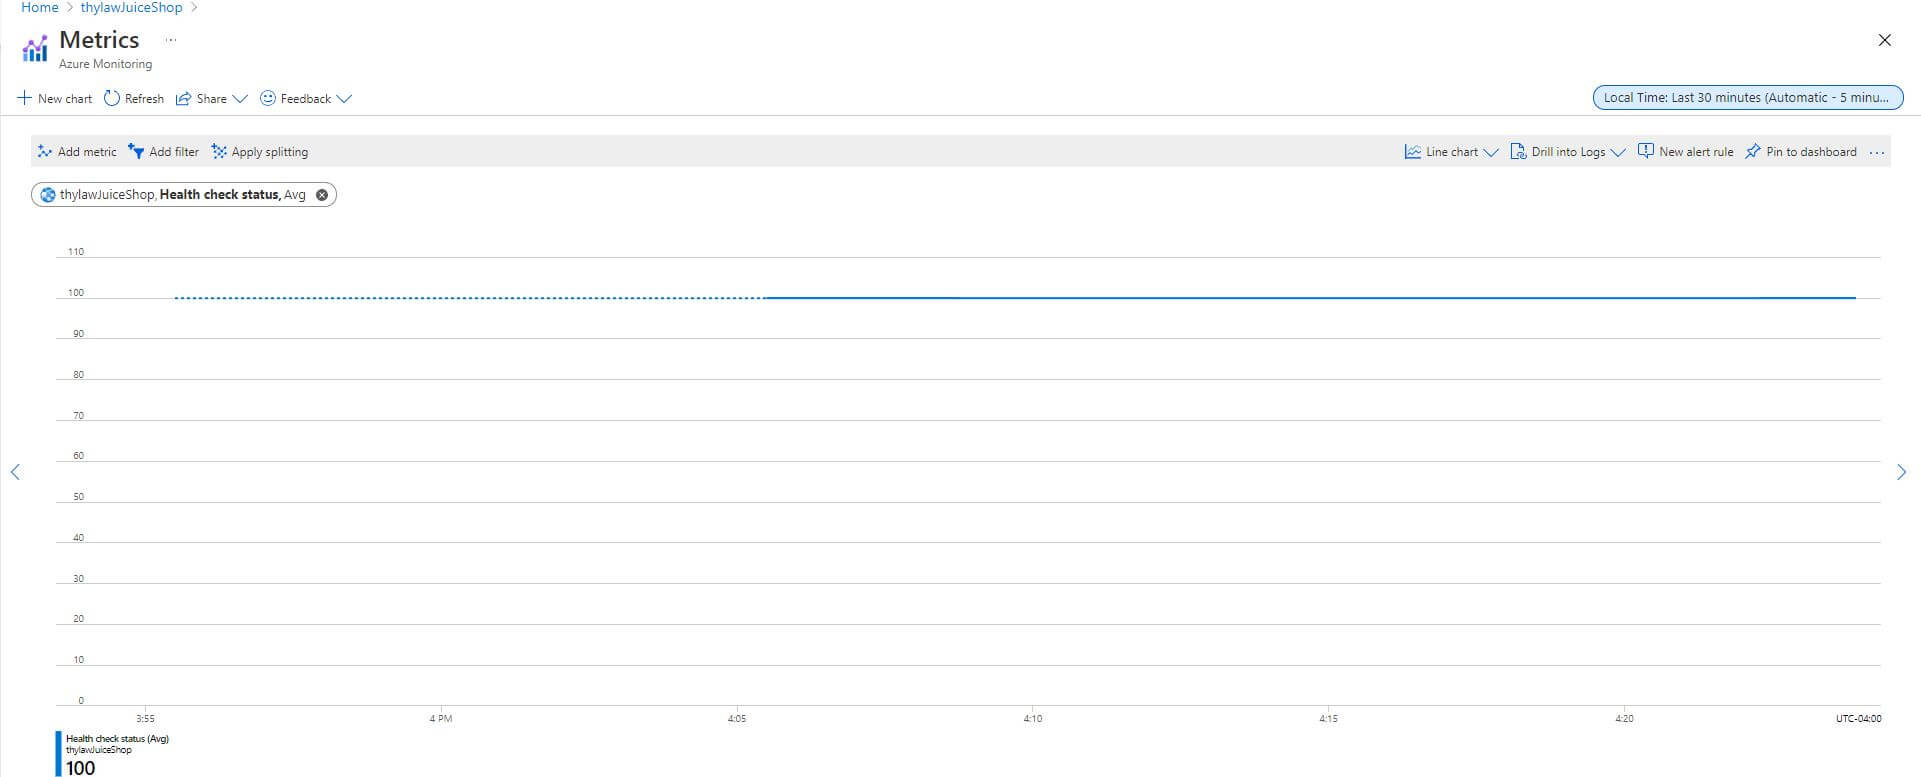
There are also health checks which allows Azure to automatically detect if your service is up and running or not.
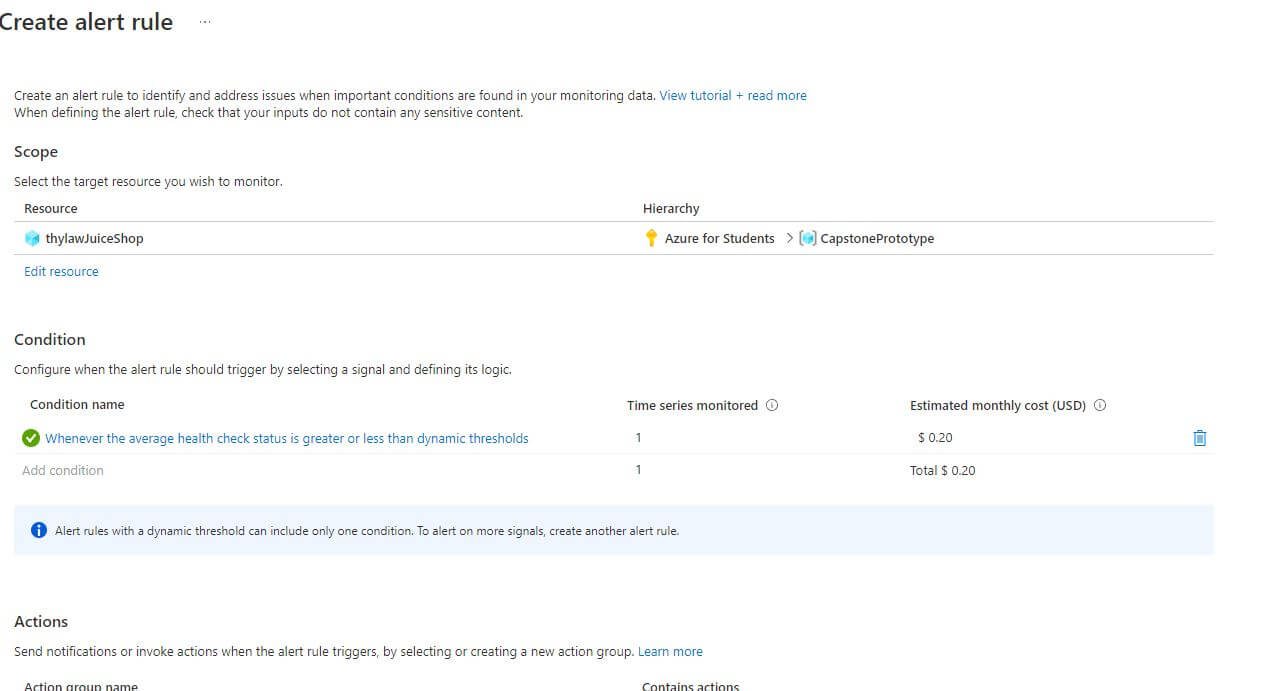
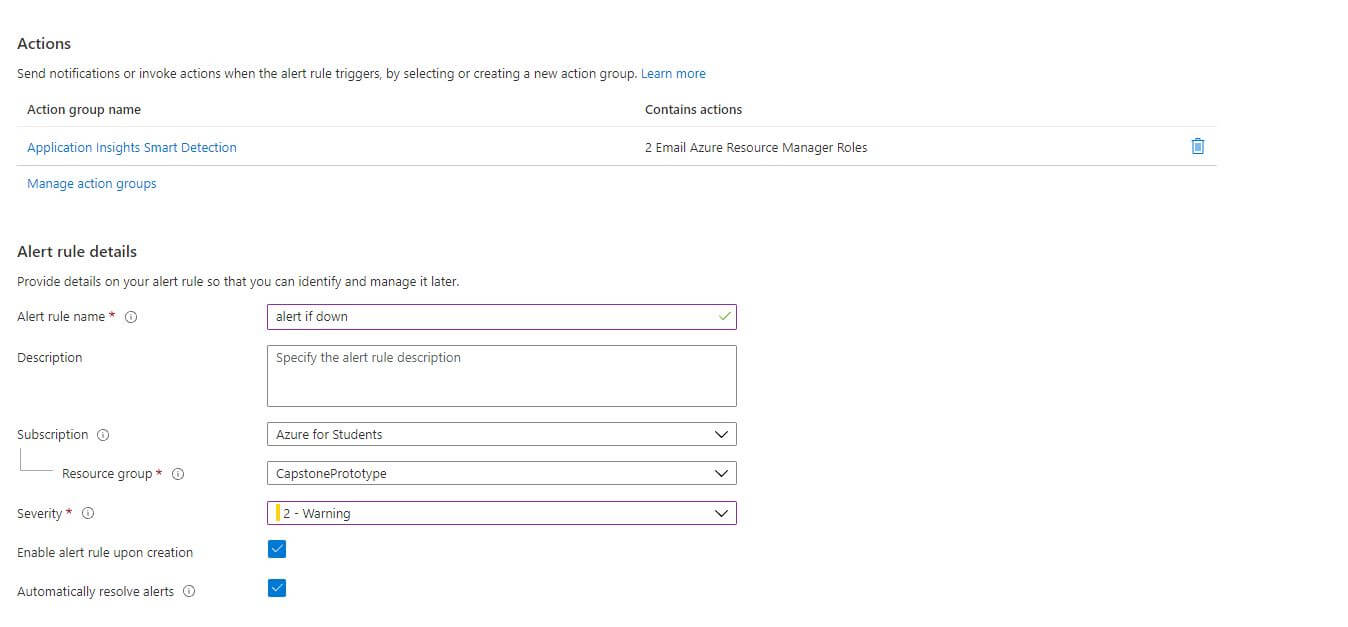
And while these are great on their own, you are also provided an ability to alert members of your organization via webhooks, messages, emails, among other things, based on alerts that you define using Azure Alerts
Other Features
Of course, this is only a small handful of what Azure App Service offers. Some other features have already been demonstrated in other posts, such as ease of network configuration and deployment from a container registry.
Azure App Service also provided Access Control, additional security, automated backups, and a plethora of other features. While it would be cool to set all of this up on a server and automate it with Ansible, I believe that this will provide me with more cloud experience.
Conclusion
That's all for this week folks! I will be searching or building a new application this next week and copying over all of the work I've done so far. I will of course have to construct a Dockerfile for that application and create a new Azuer App Service to push to and configure that. #CloudComputingRocks!