Apache CloudStack 4.15 Installation Guide

Utilizing CentOS 7, KVM, and VMware
Introduction
The information here is extracted from a well-constructed documentation hosted Here. It is recommended you use that document intead.
The goal of this guide is to walk you through the complete beginning to finish installation of Apache CloudStack on CentOS7, utilizing VMware on the host and KVM inside of the virtual machine. The management server and the agent will be installed on the same host.
It is recommended you review the "Notes" section of this guide before proceeding with the installation.
Estimated Time to Completion: 2 hours
Prerequisites
First, you need to make sure you are booted into VMware mode. Once done, start VMware Workstation.
Next, we need to get the CentOS 7.9 ISO from http://mirror.cs.pitt.edu/centos/7.9.2009/isos/x86_64/. The CentOS-7-x86_64-DVD-2009.iso will work.
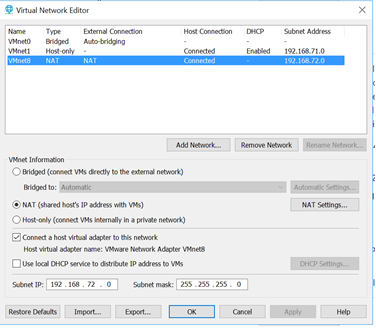
In VMware workstation, go to Edit > Virtual Network Editor.
For this scenario, we will be utilizing a NAT Network. Click on VMnet8 if it exists, and if not, create it by selecting Add Network.
For this guide, we will be utilizing the subnet network of 192.168.72.0, with a subnet mask of 255.255.255.0. The gateway we will be utilizing is 192.168.72.2.
Modify the network information to make sure NAT is selected. Also, disable DHCP. Record the network information as you will need it for later.
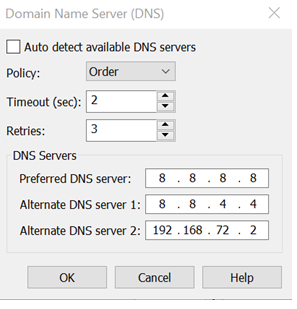
Open NAT settings. Verify and record your gateway IP address. Next, open DNS Settings at the bottom of the menu. Configure it so it looks like Figure 2 (replace with your preferences).
When you are done, press OK and exit back to the main menu. We will now begin creating our virtual machine. Press New Virtual Machine. Create a custom (advanced) machine.
This guide has utilized the ESXi 7.0 hardware compatibility configuration. CloudStack should work on Workstation 16 if you would prefer using that. For the ISO, utilize the CentOS 7.9 ISO you downloaded at the beginning of this guide.
When configuring the resources that will be given to the virtual machine, you should accommodate for the virtual machines that will be running on top of this one. Each VM will generally require 1 core, 512MB of ram, and 5GB to 20GB storage space. For this installation, I created a VM with 4 cores, 4GB of ram, and 250GB storage space.
Make sure to select NAT in network type. The I/O controller type this installation will utilize is the LSI Logic, and the virtual disk type will be SCSI.
Once the VM is done initializing, click on VM > Settings.
Make sure the network adapter is utilizing your custom network adapter.
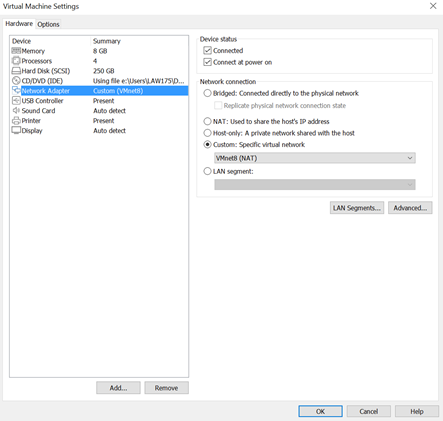
As shown in Figure 3, click on Advanced. Remember this location for your MAC Address. VMware should automatically generate a MAC address once the machine is installed, but you can generate one now if you would like.
Also shown in Figure 3, under Processors, check the box labeled "Virtualize Intel VT-x/EPT or AMD-V/RVI." This will allow for nested virtualization.
In the Options tab on the top of the same menu, make sure that the virtual machine is utilizing your chosen guest operating system type (Linux). You should now be done configuring your virtual machine.
Once done, start the virtual machine. Once you get to the installation summary screen, select Software Selection. For this guide, I utilized the Server with GUI option. You may want to do a minimal install to save resources, but I chose the GUI to make it easier to access the CloudStack Interface.
Under System, select Installation Destination. I utilized the automatic partitioning feature to make things easier, but you may want to manually partition your virtual drive. If so, do so now.
Under Network, configure your network adapter. Go to IPV4 Settings and select Manual from the drop-down menu. There, click add and add in the IP address of the machine. This should be the IP that you plan to utilize for the management server. I utilized the IP address of 192.168.72.3

Configure the interface similarly to Figure 4. Once done, disable IPV6 in IPV6 settings. Then, click save and exit. You can then enable the interface. If it does not stay on and connected, you will want to verify your network settings are correct before proceeding.
If everything is how you would like, you can go ahead with the install. You should now be able to configure your root password and user. Wait for the installation to complete.
Once the installation has completed, open a new terminal. For the rest of this guide I will be utilizing the SU command to become the super user, so as to not have to utilize the sudo command. This could be dangerous, so to mediate that, I will be creating frequent snapshots so I will be able to revert back easily and with little progress lost. It is recommended you also create frequent snapshots.
Installation
Update your system with the command yum -y upgrade. If the command gives errors because it is sleeping, run systemctl stop packagekit and then retry. It is recommended that you reboot and take a snapshot before proceeding.
Once your system is updated, run the command hostname --fqdn. This will probably return localhost, which is not what we want. CloudStack requires a unique hostname and domain for things to work properly. To remedy this, open /etc/hosts/.
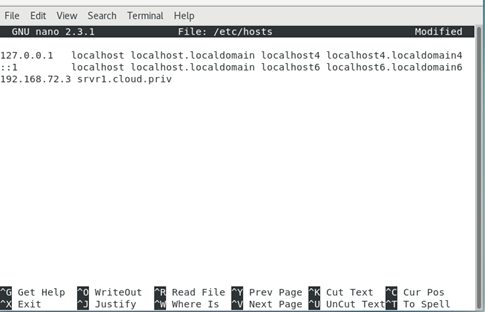
As shown in Figure 5, add the line <yourip> srvr1.cloud.priv. Reboot the system, and run the hostname --fqdn. If it does not change, utilize the command hostnamectl set-hostname srvr1.cloud.priv
Once done, run the command yum install bridge-utils net-tools -y
Next, we will modify the interface files to create the bridges that CloudStack requires. In the /etc/sysconfig/network-scripts/ directory, create the following files**: ifcfg-cloudbr0 ifcfg-cloudbr1**. It is required that these bridges are named as stated.
In the same directory, find the name of your default interface. For me, that is the ens33 interface. We will need to create a VLAN for that interface, so create the file ifcfg-ens33.200 in the same directory.
You should now have the following similarly interfaces**: ifcfg-cloudbr0**, **ifcfg-cloudbr1**, **ifcfg-ens33**, and **ifcfg-ens33.200**. If you have **the ifcfg-lo** interface, you can safely ignore it.
Open the file of your default interface. I will open it utilizing the command nano /etc/sysconfig/network-scripts/ifcfg-ens33. Replace the text within the following:
TYPE="Ethernet"
BOOTPROTO="none"
NAME="ens33"
UUID=" "
DEVICE="ens33"
HWADDR=" "
ONBOOT="yes"
BRIDGE="cloudbr0"
UUID should be the default. If there is no UUID, it can be generated by utilizing the command uuidgen. Be sure to do this for any other interface that required a UUID. Under HWADDR, put in the MAC address you generated earlier.
Now, open the interface ifcfg-cloudbr0. Replace the fields with your own information. Be sure to generate a UUID for the UUID field.
TYPE="Bridge"
BOOTPROTO="none"
IPV6INIT="no"
IPV6_AUTOCONF="no"
NAME="cloudbr0"
UUID=""
DEVICE="cloudbr0"
ONBOOT="yes"
DELAY="5"
IPADDR="192.168.72.3"
PREFIX="24"
GATEWAY="192.168.72.2"
DNS1="8.8.8.8"
DNS2="8.8.4.4"
DNS3="192.168.72.2"
STP="yes"
We will now create the second bridge for your VLAN network. Open the ifcfg-cloudbr1 interface and add in the following information:
DEVICE="cloudbr1"
TYPE="Bridge"
BOOTPROTO="none"
IPV6INIT="no"
IPV6_AUTOCONF="no"
DELAY="5"
ONBOOT="yes"
STP="yes"
Finally, we need to modify the VLAN file. The HWADDR should be the same as your default interface. Open ifcfg-ens33.200 and add the following information:
BOOTPROTO="none"
DEVICE="ens33.200"
HWADDR="00:50:XX:XX:XX:XX"
ONBOOT="yes"
DELAY="5"
STP="yes"
VLAN="yes"
BRIDGE="cloudbr1"
You should now be done configuring your interfaces. Reboot your system. Run the following commands: systemctl status network, systemctl status NetworkManager, and ping cloudstack.apache.org.
Verify that there are no errors with your network and that it started correctly, as well as the Network Manager. If these display errors, then there is probably an issue with your configuration. You should be able to ping successfully. If not, but you are able to ping your gateway, check your DNS settings.
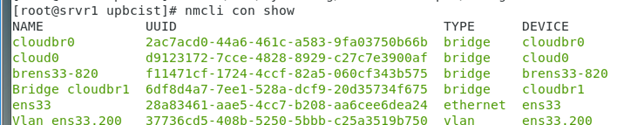
Figure 6 shows how nmcli should look when running the command nmcli con show, with the exception of brens33, which you can ignore. This will be created when you configure CloudStack later. If your network is setup correctly and is working, you are free to move on to the next step.
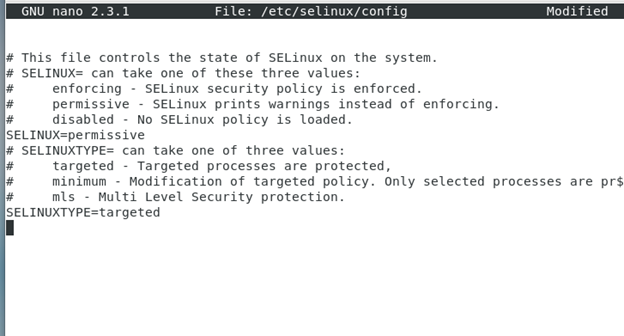
Disable SELinux by running the command setenforce 0 and then editing the file /etc/selinux/config and setting SELINUX=permissive.
The firewall can cause issues with the installation, so we will disable it with the command systemctl stop firewalld, and systemctl disable firewalld. This guide will be utilizing the iptables firewall later.
Run the command yum -y install ntp and enable it using systemctl enable ntpd, systemctl start ntpd.
Install Chrony if you don't already have it installed with the command yum install chrony.
We will now need to add the CloudStack repository to be able to install it. Create and edit the /etc/yum.repos.d/cloudstack.repo file. Add the following lines:
[cloudstack]
name=cloudstack
baseurl=http://download.cloudstack.org/centos/$releasever/4.15/
enabled=1
gpgcheck=0
We will now modify the iptables rules to allow for port forwarding and make sure connections are not blocked. (See Note 3 for some needed details before continuing.) First, define the variable NETWORK=192.168.72.0/24 (your network)
iptables -A INPUT -s $NETWORK -m state --state NEW -p udp --dport 111 -j ACCEPT
iptables -A INPUT -s $NETWORK -m state --state NEW -p tcp --dport 111 -j ACCEPT
iptables -A INPUT -s $NETWORK -m state --state NEW -p tcp --dport 2049 -j ACCEPT
iptables -A INPUT -s $NETWORK -m state --state NEW -p tcp --dport 32803 -j ACCEPT
iptables -A INPUT -s $NETWORK -m state --state NEW -p udp --dport 32769 -j ACCEPT
iptables -A INPUT -s $NETWORK -m state --state NEW -p tcp --dport 892 -j ACCEPT
iptables -A INPUT -s $NETWORK -m state --state NEW -p tcp --dport 875 -j ACCEPT
iptables -A INPUT -s $NETWORK -m state --state NEW -p tcp --dport 662 -j ACCEPT
iptables -A INPUT -s $NETWORK -m state --state NEW -p tcp --dport 8250 -j ACCEPT
iptables -A INPUT -s $NETWORK -m state --state NEW -p tcp --dport 8080 -j ACCEPT
iptables -A INPUT -s $NETWORK -m state --state NEW -p tcp --dport 9090 -j ACCEPT
iptables -A INPUT -s $NETWORK -m state --state NEW -p tcp --dport 16514 -j ACCEPT
iptables -A INPUT -s $NETWORK -m state --state NEW -p tcp --dport 1609 -j ACCEPT
iptables -A INPUT -s $NETWORK -m state --state NEW -p tcp --dport 8443 -j ACCEPT
iptables -A INPUT -s $NETWORK -m state --state NEW -p tcp --dport 9090 -j ACCEPT
iptables -A INPUT -s $NETWORK -m state --state NEW -p tcp --dport 22 -j ACCEPT
iptables -A INPUT -s $NETWORK -m state --state NEW -p tcp --dport 1798 -j ACCEPT
iptables -A INPUT -s $NETWORK -m state --state NEW -p tcp --dport 5900:6100 -j ACCEPT
iptables -A INPUT -s $NETWORK -m state --state NEW -p tcp --dport 49152:49216 -j ACCEPT
iptables -A INPUT -s $NETWORK -m state --state NEW -p tcp --dport 2049 -j ACCEPT
iptables -A INPUT -s $NETWORK -m state --state NEW -p tcp --dport 53 -j ACCEPT
iptables -A INPUT -s $NETWORK -m state --state NEW -p tcp --dport 3922 -j ACCEPT
Save with iptables-save > /etc/sysconfig/iptables-config and then open the /etc/sysconfig/iptables-config and make sure your rules are there before continuing.
We will now install MySQL. CentOS7 no longer supports the SQL libraries that we need, so we need to first create the libraries ourselves. Run the command wget http://repo.mysql.com/mysql-community-release-el7-5.noarch.rpm and then rpm -ivh mysql-community-release-el7-5.noarch.rpm.
To install MySQL, run the command yum install mysql-server.
Edit the /etc/my.cnf file and add the following under [mysqld]:
innodb_rollback_on_timeout=1
innodb_lock_wait_timeout=600
max_connections=350
log-bin=mysql-bin
binlog-format = 'ROW'
To finish installing MySQL, we need to enable and start the service using systemctl enable mysqld and systemctl start mysqld.
We then need to run the following command: mysql_secure_installation. It will ask for a password, as we have not set one yet, leave it blank.
Selecting yes will be fine for all answers, but if you would like to be able to connect remotely, it may be better to say no to the choice asking if you would like to disable remote connections.
Before installing the database and management server, we will need to prepare our NFS shares for storage. First, we will install NFS by running the command:
yum install nfs-utils.
Create two directories that you will use for primary and secondary storage: mkdir -p /export/primary and mkdir -p /export/secondary
Configure these directories to make them usable for storage by editing the /etc/exports file and adding the following lines:
/export/secondary *(rw,async,no_root_squash,no_subtree_check)
/export/primary *(rw,async,no_root_squash,no_subtree_check)
Then, run the command exportfs -a
Edit the /etc/sysconfig/nfs file and uncomment the following lines:
LOCKD_TCPPORT=32803
LOCKD_UDPPORT=32769
MOUNTD_PORT=892
RQUOTAD_PORT=875 (You may have to add this line if it does not exist)
STATD_PORT=662
STATD_OUTGOING_PORT=2020
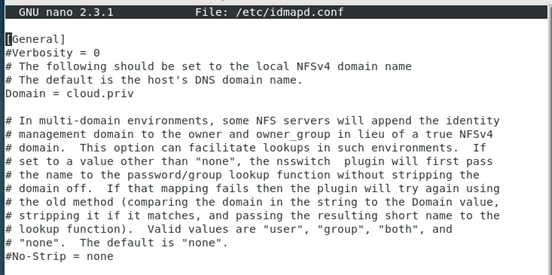
Open the /etc/idmapd.conf and uncomment and change the domain to yours, similar to that shown in Figure 8. "Domain = cloud.priv"
Execute the following commands to enable NFS:
service rpcbind start
service nfs start
chkconfig nfs on
chkconfig rpcbind on
Finally, we finish setting up NFS by creating the following directories to be able to mount our exports folder. mkdir -p /mnt/primary and mkdir -p mnt/primary.
To test that our storage devices are mountable, run the following command while replacing the IP address with your IP address:
mount -t nfs 192.168.72.3:/export/secondary /mnt/secondary
If this runs without errors, check that it is up utilizing the mount command. If it is successful, unmount it with the umount /mnt/secondary command. You will only want to unmount this folder if you are installing your VMs on the management server, which we are. See references [Management Server] for additional information.
Do the same tests for /primary. Make sure that when done both primary and secondary are unmounted.
Then, we will run the command yum -y install mysql-connector-python as Java comes preinstalled, but Python does not.
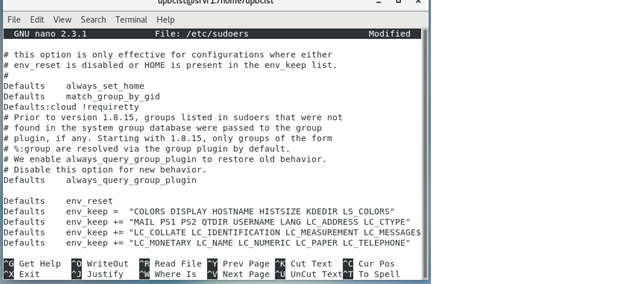
One last prerequisite step before installing the Management Server is to edit the etc/sudoers file and add Defaults:cloud !requiretty where other defaults are located.
You are now ready to install the Management Server. A reboot and a snapshot are recommended before proceeding. Be sure that all installed services are enabled, and that your network is fully configured.
To install Management Server, run the command yum install cloudstack-management
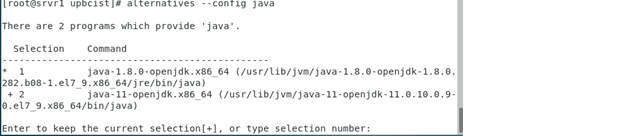
Once finished, run the command alternatives --config java and be sure that Java 11 is set, as shown in Figure 10.
Reboot the machine and ensure management is running by utilizing the command systemctl status cloudstack-management. If management is operating correctly, run the following command:
cloudstack-setup-databases cloud:<dbpassword>@localhost --deploy-as=root:<root password>
Once the database is setup, run cloudstack-setup-management
Now that CloudStack management is installed, the iptables should be able to function as a service.
Sometimes iptables does not load the configuration file, causing issues with configuration. Once management is installed, a new file should be created outlying cloud stack's rules under /etc/sysconfig/iptables. To be sure our rules have been saved and are being utilized by CloudStack, we will once again append the rules we defined earlier to this file in the input section:
iptables -A INPUT -p tcp -m state --state NEW -m tcp --dport 22 -j ACCEPT
iptables -A INPUT -p tcp -m tcp --dport 111 -j ACCEPT
iptables -A INPUT -p tcp -m tcp --dport 892 -j ACCEPT
iptables -A INPUT -p tcp -m tcp --dport 32803 -j ACCEPT
iptables -A INPUT -p tcp -m tcp --dport 32769 -j ACCEPT
iptables -A INPUT -p tcp -m tcp --dport 2049 -j ACCEPT
iptables -A INPUT -p tcp -m tcp --dport 875 -j ACCEPT
iptables -A INPUT -p tcp -m tcp --dport 662 -j ACCEPT
iptables -A INPUT -p tcp -m tcp --dport 16514 -j ACCEPT
iptables -A INPUT -p tcp -m tcp --dport 9090 -j ACCEPT
iptables -A INPUT -p tcp -m tcp --dport 8080 -j ACCEPT
iptables -A INPUT -p tcp -m tcp --dport 3922 -j ACCEPT
iptables -A INPUT -p tcp -m tcp --dport 53 -j ACCEPT
iptables -A INPUT -p tcp -m tcp --dport 49152:49216 -j ACCEPT
iptables -A INPUT -p tcp -m tcp --dport 5900:6100 -j ACCEPT
iptables -A INPUT -p tcp -m tcp --dport 1798 -j ACCEPT
iptables -A INPUT -p tcp -m tcp --dport 22 -j ACCEPT
iptables -A INPUT -p tcp -m tcp --dport 8443 -j ACCEPT
iptables -A INPUT -p tcp -m tcp --dport 8250 -j ACCEPT
iptables -A INPUT -p tcp -m tcp --dport 16509 -j ACCEPT
iptables -A INPUT -p tcp -m tcp --dport 1798 -j ACCEPT
Save the file with iptables-save. Verify that all of the ports listed are listed when running the command. See Note 8
Once finished, the last thing you will have to do is add the systemvm template for KVM. Run the following command:
/usr/share/cloudstack-common/scripts/storage/secondary/cloud-install-sys-tmplt -m /export/secondary -u http://download.cloudstack.org/systemvm/4.15/systemvmtemplate-4.15.0-kvm.qcow2.bz2 -h kvm -F
This may take a few minutes to finish. Once it is done, you have setup your Management Server, and are now ready to install the Agent.
Run the command yum install -y epel-release and, once done, install the agent by utilizing the command yum install cloudstack-agent
We will now configure the virtualization manager of the host, which is libvirt. Edit the /etc/libvirt/libvirtd.conf file and uncomment the following lines:
listen_tls = 0
listen_tcp = 1
tcp_port = "16509"
auth_tcp = "none"
mdns_adv = 0
Then, edit the /etc/sysconfig/libvirtd file and uncomment #LIBVIRTD_ARGS="--listen" line.
Finally, edit the /etc/libvirt/qemu.conf file and uncomment the line vnc_listen=0.0.0.0 and then reboot the machine.
Now that everything installed, we will need to check once more to make sure our vital services are running and operational. The agent sometimes is not enabled by default, so be sure to enable and start the service and then reboot to verify. Some services you should check with the following commands: systemctl status [x] with x being libvirtd, cloudstack-management, cloudstack-agent, network, NetworkManager, and nfs.
It will also be wise to run the command journalctl -xe to check for additional problems. Errors should be addressed before configuration. An error concerning SSL can generally be ignored until after configuration is complete.
Configuration
You can now access your client by going into your browser, and in the search bar, typing in the url:
Your login username should be admin, and your password should be password.
When inside of the interface, click on continue with installation. It will ask for you to change your username and password. Do so and proceed. It is recommended you take a look at [Cloudstack Configuration] in resources for information on how you will want to configure your Cloudstack Install.
It will first ask you if you would like to create a security group.
"Guest isolation can be provided through layer-3 means such as security groups (IP address source filtering)."
For this installation, I have elected to not enable a security group. Clicking continue, CloudStack will ask you to define a Zone. Required fields are the name, IPv4 DNS1, Internal DNS 1, and Hypervisor.
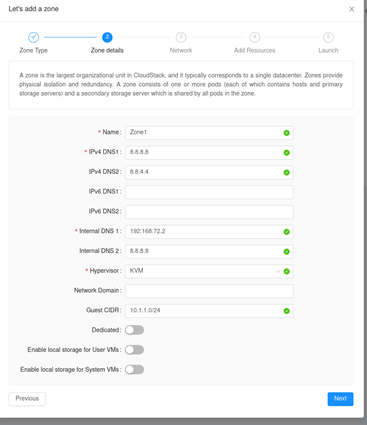
Figure 11, Zone Config
Under network, you can leave your Physical Network as default, as shown in Figure 12.
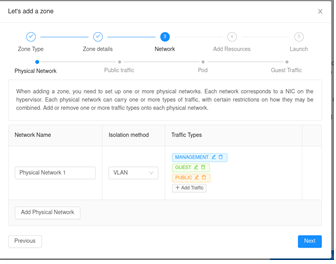
Figure 12, Physical Network
You will then be asked to configure your public traffic. Fill in the information similarly to Figure 13.
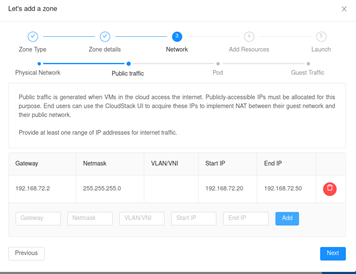
Figure 13, Public Traffic
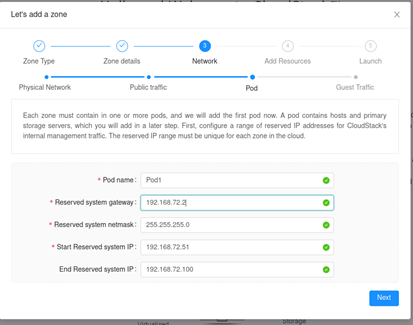
Then configure your pod. Select the range of reserved system IP's as shown in Figure 14.
Then, configure your guest network as so:
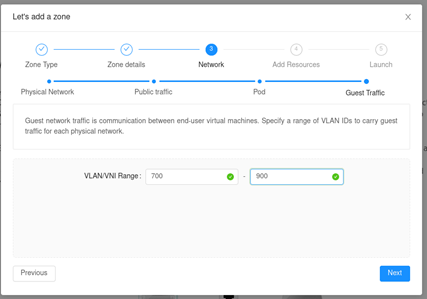
After configuring your guest network, CloudStack will ask you for your VLAN range. I used the vlan range of 700-900 as shown in Figure 15:
Click next and then give your Cluster a name.
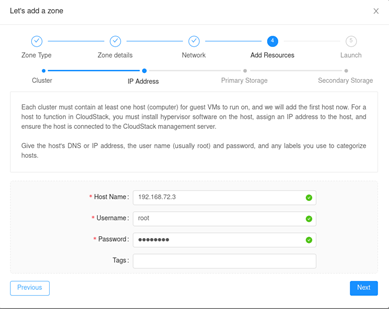
Give your host the name of your host IP address, followed by the login of root / password of the root user on your host, as shown in Figure 16.
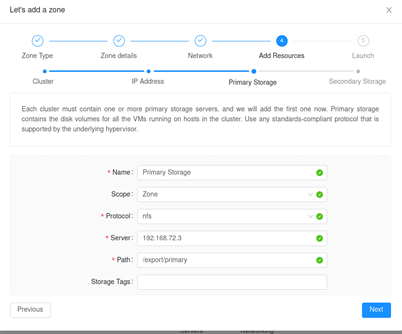
Then, configure your primary storage as shown in Figure 18. Be sure to select nfs as the protocol. The server is the host IP address, and the path is the /export/ directories we made earlier. Do the same for your secondary storage, substituting secondary for primary.
Once done, hit install. If you encounter any errors, verify that your iptables are configured correctly. Wait a few minutes for everything to initialize before configuring CloudStack. Test your connection by navigating to infrastructure and clicking on your secondarystoragevm. If it is up and running, and you are able to connect to it, then you should have an operational installation. It will also be good practice to run the health check as stated in note 5.
At this stage, you have completed your installation. Please see results. Also, please see the usage tips post for more information on using CloudStack.
Results
You should hopefully have a working Apache CloudStack installation running. You also know how to deploy an "Advanced Network" for your installation. Please see the notes and references for additional information and questions.
Notes
This section will include general advice, troubleshooting aid, and additional information.
-
It is recommended to reboot the system instead of restarting a service whenever possible.
-
The network may stop working if booting from a saved state. Rebooting should fix the issue.
-
You may encounter an error when attempting to add an ISO or Template to CloudStack. You will need to configure your SSL certificates to make this happen, as it will only work with a secure HTTPS connection. See "Uploading ISO" reference for more information.
-
Upon reboot after installing CloudStack-Management, Cloud Stack's system VM's and instances may be reported as up but will be unable to connect. For some reason, iptables becomes a service that is able to be started and stopped. If you run systemctl enable iptables and systemctl start iptables, it should fix the issue (give it a minute). I am unsure why this happens. If you attempt to run those commands earlier in this guide, centos will reply that iptables is not a service.
-
To troubleshoot the secondary storage, or to run the health check, please see the "Troubleshooting Secondary Storage" reference.
-
When accessing a virtual machine, there is a hard to see bar on the left side of the screen within the browser. This is where you can pass in commands such as clipboard and "Control Alt Delete" to the virtual machine.
-
A possible bug fix for issues with your storage is to access the global configuration settings within CloudStack UI and set secstorage.allowed.internal.sites = <your network>
-
If your SSL errors are crippling your installation, you may need to disable the ca.auth configuration in global settings.
-
Agent and Management logs are in /var/logs/cloudstack/.
-
To be triple sure my iptables have saved, I manually added the iptables list to the /etc/sysconfig/iptables file. This shouldn't be required, but if your systemvms and instances are unable to connect, you should try doing this.
References
[Agent Install] Apache Foundation. "Host KVM Installation --- Apache CloudStack 4.15.0.0 Documentation." Apache CloudStack, Apache Foundation, 2021, https://docs.cloudstack.apache.org/en/latest/installguide/hypervisor/kvm.html
[Management Server Install] Apache Foundation. "Management Server Installation --- Apache CloudStack 4.15.0.0 Documentation." Apache CloudStack, A, 2021, http://docs.cloudstack.apache.org/en/latest/installguide/management-server/index.html
[Quick Installation Guide] "Quick Installation Guide --- Apache CloudStack 4.15.0.0 Documentation." Apache CloudStack, Apache Foundation, 2021, http://docs.cloudstack.apache.org/en/latest/quickinstallationguide/qig.html
[VPC]Apache Software Foundation. "Configuring a Virtual Private Cloud." Apache Docs, 2016, docs.cloudstack.apache.org/projects/archived-cloudstack-http://docs.cloudstack.apache.org/projects/archived-cloudstack-administration/en/latest/networking/virtual_private_cloud_config.html
[Cloudstack Configuration] Apache Software Foundation. "Configuring Your CloudStack Installation --- Apache CloudStack 4.15.0.0 Documentation." Apache Cloudstack, Apache Software Foundation, 2021, http://docs.cloudstack.apache.org/en/latest/installguide/configuration.html#initialize-and-test
Apache Software Foundation. "Log In to the UI." Apache CloudStack Docs, Apache Software Foundation, 2021, https://docs.cloudstack.apache.org/en/latest/adminguide/ui.html
[Mailing List for Questions, Strong Troubleshooting Reference] Apache Software Foundation. "Pony Mail!" Pony Mail, Apache Software Foundation, 2021, https://lists.apache.org/list.html?users@cloudstack.apache.org
[Uploading ISO] "Working With Templates." Apache CloudStack, Apache Software Foundation, 2021, https://docs.cloudstack.apache.org/en/latest/adminguide/templates.html
[Troubleshooting Secondary Storage] Prasanna. "SSVM, Templates, Secondary Storage Troubleshooting." Cwiki Apache, cwiki, 2014, https://cwiki.apache.org/confluence/display/CLOUDSTACK/SSVM,+templates,+Secondary+storage+troubleshooting
[New Total Learners Resource on CloudStack] ShapeBlue. "Shapeblue/Hackerbook." GitHub, Apache Software Foundation, 2021, https://github.com/shapeblue/hackerbook
[Some Ports Used By Cloudstack]Yadav, Rohit. "Ports Used by CloudStack." Cwiki, Apache Foundation, 2013, https://cwiki.apache.org/confluence/display/CLOUDSTACK/Ports+used+by+CloudStack
[CloudStack Configuration] "Rohit Yadav - Apache CloudStack on Ubuntu with X86_64 KVM." Rohit Yadav, Rohit Yadav, 4 July 2019, https://rohityadav.cloud/blog/cloudstack-kvm