Capstone Project: Week 11, Unit Tests
Welcome to week 11 of my Capstone Project: CI/CD Pipelines and DevOps infrastructure! We are getting near the end of the project as I present it December 8th, and I need to spend a week to craft my presentation, paper, and video. However, I have fall break this next week, so I hope to really nail in everything I want to do in that last sprint! Let's get into this week's update!
Also, to all of my interviewers who have browsed my blog, THANK YOU! I appreciate it a lot for your interest and I hope you get to learn more about me and my work ethic!
Outcomes
- Unit Tests - Created a unit test to test for XSS on my website
- Implemented into Pipeline - I now am able to not only run a unit test on my project, I am also able to deploy the test results into a nice GUI format for further research
- Python Experience - This test required me to research a lot about python packages such as Pycurl, requests, and more.
- Curl Experience - I knew about curl, but I have never used it for actually diagnosing issues with a website before. I have used it quite extensively this past week and now I feel very confident in the syntax.
Unit Test
Unit tests are tests that basically is run to determine if a certain "unit" or "piece" of code is satisfactory and produces the results the developer desires. Unit tests are crucial in development and are very frequently found in CI/CD Pipelines. As such, Azure DevOps has a wonderfully built in integration for displaying test results that I aspired to utilize.
The Test
The main goal for my unit test is to determine if my project autoescapes characters submitted on the form of my application. I had to really rack my brain at trying to figure out how to get this to work, and I could not come up with any answers, so I decided to investigate what actually occurs with the autoescape vulnerability
As you may know, the vulnerability is written within the Jinja2 template itself:
1<center>
2  <p style="font-size:2em;">{% autoescape false %}{{xss}}{% endautoescape %}</p>
3</center>
As you can see, the code tells the Jinj2 compiler to insert the variable passed into it from the app.py (xss) but to not autoescape the characters. As such, <script>alert(123)</script> will be run, when otherwise the characters would be escaped and look like < > etc.
So, how do I extract this information to create a test out of it?
Figuring it Out
My first guess, because of my limited knowledge on Jinja2, was to simply extract the value from the form and see if it was escaped. Well, as it was a simple form submit, the words were of course not autoescaped within the app.py.
Then, I went on and discovered that the code did not display if it was run, meaning it was not autoescaped, but it would display the input not autoescaped but not run if autoescape was enabled. This confused me. If I can't see the autoescape happening in the browser or in the app.py, then how can I effectively test this?
After some thinking, I found the following code which I had initially planned to replace my input with autoescaped characters automatically which would then be displayed in the browser: html_output = Markup(str(escape(xss))) which returns <script>console.log("hello")</script> assuming your input is <script>console.log("hello")</script>
However, this wasn't a good idea, and I still didn't even know how to extract this information. I had first thought of using the beautifulsoup package in python to extract contents of a page, but that wouldn't work for the required POST request submission. After some time, I reached out to my friend Tess who recommended I use cURL.
I had to figure out how to use cURL for POST requests, and after some time, I was able to come up with the following command that worked: http://localhost:5000/home -X POST -d "string=<script>alert(123)</script>" With that, I was able to submit a post request and see my input lodged within the rendered template.
Even still, there was no autoescape anywhere visible. So, the best method I could come up with was to simply determine if my input is found anywhere on the page. This isn't really testing XSS, but it will work for my purposes. Now, to create the test.
Bash
Tess was kind enough to provide a simple BASH script that would do exactly what I wanted. My first goal was to understand what was going on. It took me a while to get it to work on my computer for some reason (thanks Windows!), but eventually it did work just how it was intended. I was able to test this in both a Docker container and locally running app.py
Bash script:
1Response=$(curl -X POST http://127.0.0.1:5000/home --data "string=<script>alert('XSS')</script>")
2if [[ $? -gt 0 ]]
3then echo "Error connecting to website."
4else
5    if [[ ! -z $(echo ${Response} | grep "<script>alert('XSS')</script>") ]]
6    then echo "FAIL: XSS detected in website."
7    else echo "PASS: XSS mitigated in website."
8    fi
9fi
Here we are simply making sure that there is a response and the request was successful, then grepping for the exact input. If it exists, the test fails, if it does not, the test passes.
While this may have worked for me, I decided I want to convert this to python and use pytest to demonstrate the technology that would actually be used in real scenarios.
Python Test
Converting this test to python was difficult. The first thing I had to do was figure out how to get a curl like response from the web page with python. I had initially used the following code which I had hoped would work but did not:
1import requests
2url = "http://localhost:5000/posts"
3mydata = "string=<script>alert('XSS!')</script>"
4
5x = requests.post(url)
6print(x.content)
Unfortunately, this package does not return the rendered template, meaning that what ever I submit in my POST request will never show up on the webpage. After some more investigation, I decided to move on and find a python package that would work better.
Pycurl
The package I found that has solved my issues is Pycurl. It took an excessively long time to get this package to work because as it turns out, it requires libcurl. This apparently is not found in Windows and the documentation doesn't really demonstrate how to install it for Windows. Pycurl is the same in that regard. As such, I was able to get it to work on my Ubuntu Linux VM, and I am happy to report I have created a very similar test using Pycurl:
curl.py
 1import pycurl
 2
 3# try python 3, if not work, try python 2
 4try:
 5    # python 3
 6    from urllib.parse import urlencode
 7except ImportError:
 8    # python 2
 9    from urllib import urlencode
10
11
12def xss():
13
14    # input post field
15    mydata = "string=<script>alert('XSS!')</script>"
16    # data to grep
17    search_data = "<script>alert('XSS!')</script>"
18
19    # curl and save to file to grep later
20    with open('out.html', 'wb') as f:
21
22        # intiialize pycurl and set url
23        c = pycurl.Curl()
24        c.setopt(c.URL, 'http://localhost:5000/home')
25
26        # set options to be post request
27        c.setopt(c.POSTFIELDS, mydata)
28
29        # set option of pycurl to write to file
30        c.setopt(c.WRITEDATA, f)
31
32        # execute and close (return results)
33        c.perform()
34        c.close()
35
36    # intialize binary to determine if XSS found
37    foundXSS = 0
38
39    # open file and iterate through each line, if line detected change 'foundXSS' to true (1)
40    with open ('out.html', 'r') as f:
41        for line in f:
42            if search_data in line:
43                foundXSS = 1
44                print(line)
45                break
46
47    if foundXSS == 1:
48        print("XSS Found!")
49        return foundXSS
50    else:
51        print("No XSS Found!")
52        return foundXSS
53
54xss()
55
To make this into an effective test, I created a new test_curl.py, which followed the pytest format, which just has the following code:
1import curl
2
3def test_xss():
4    assert curl.xss() == 0
Running the pytest command, I expect to receive 0, which means that the code was not found anywhere within the rendered template. If I get 1, the test fails.
Pipeline Testing
After all of this work, I had realized that there was an issue: I was extracting information from a live page. The next question was how do I incorporate this into my pipeline. My hope was that I would be able to run the docker container within the pipeline like normal, where I could access it on port 5000 with curl.
After consulting the Docker Task Documentation for Azure DevOps, I was unable to find what I needed. I could build the Docker image from my Dockerfile, but there was no task to run it. Trying to run the container locally also offered no fruit as Azure DevOps repeatedly could not find the image locally. I have no way to really troubleshoot these Azure DevOps agents without making an Agent myself, so I opted for the next best option.
I have decided to something similar to what I did with Hadolint. I simply would bring down a Docker image from a repository and run it; my Docker container to be exact. So, I decided to build and push this container to a separate Dockherhub repository and then do a docker run command using the command prompt task and run it on port 5000.
To test that it worked, I ran a curl command on that container and it worked. Awesome! This means that the Docker container persists through each step and I am able to access it locally with curl. Now to incorporate pycurl.
Pipeline Implementation
I initially failed to get this to work as Azure DevOps instantly spit out errors when attempting to install the pycurl package. Upon further investigation, as mentioned earlier, I discovered I needed to install libcurl on the Agent. Normal packages would not work, but eventually installing libcurl4-openssl-dev which allowed me to install pycurl correctly.
With pycurl officially installed on my agent, I was able to run my test_curl.py file with the PythonScript@0 task and it worked!
1  - task: PythonScript@0
2            inputs:
3              scriptSource: 'filePath'
4              scriptPath: '$(Build.SourcesDirectory)/test_curl.py'
Publish Task Results
Finally, knowing that it worked how it was supposed to, I simply had to convert this into pytest with the Azure DevOps support to automatically Publish Test Results. I didn't even need to use the PublishTestResults task!
1          - script: |
2                            pip install --upgrade pycurl pytest pytest-azurepipelines bandit
3            displayName: "Install Python Dependencies"
4            - script: |
5                                python -m pytest test_curl.py
6            displayName: "pytest"
As a result, I get my beautiful test results with tons of information as well as an output directly to the pipeline!
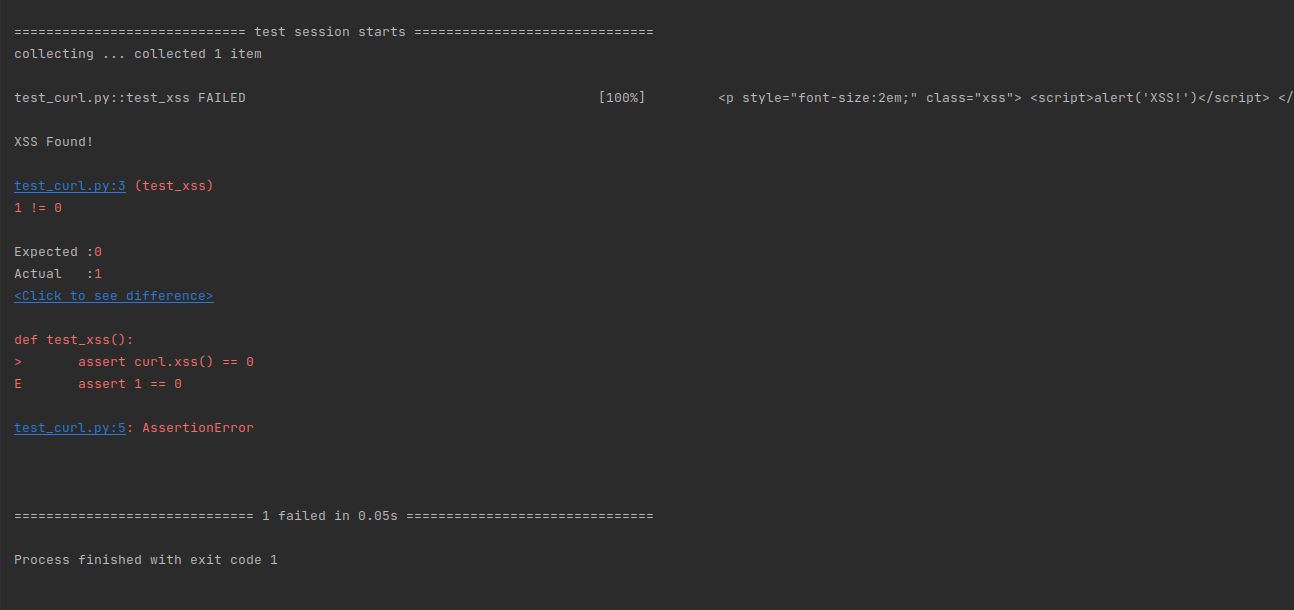
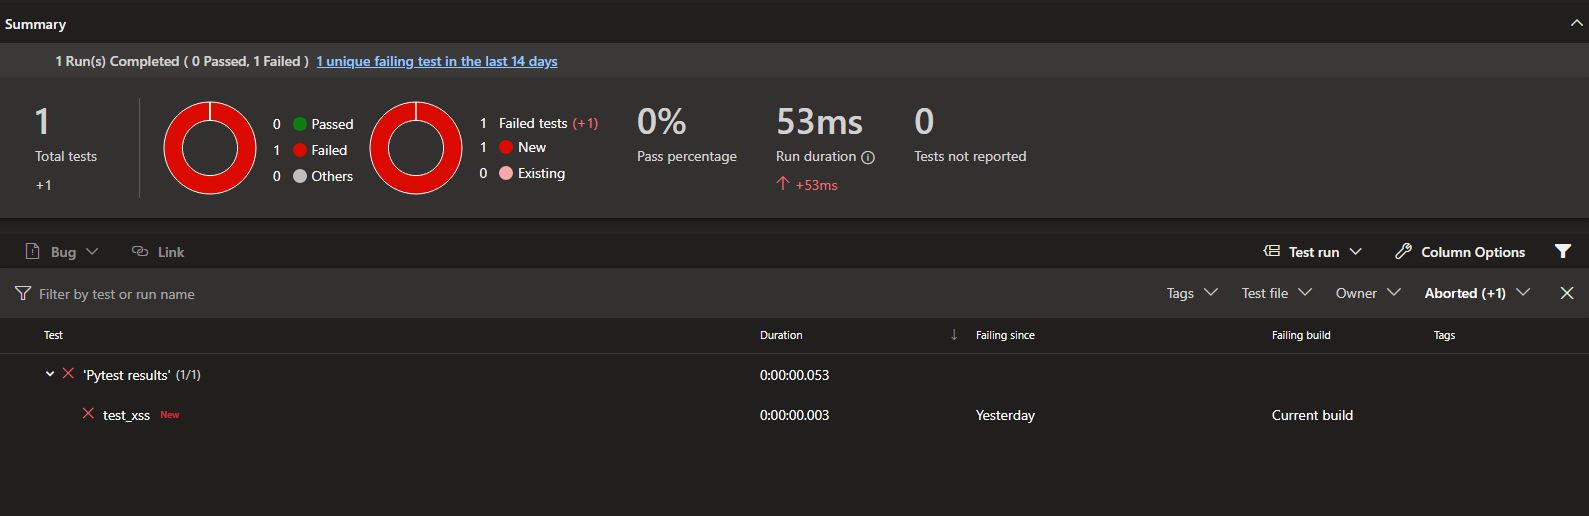
Assuming it failed, this is what the Test Results looks like:
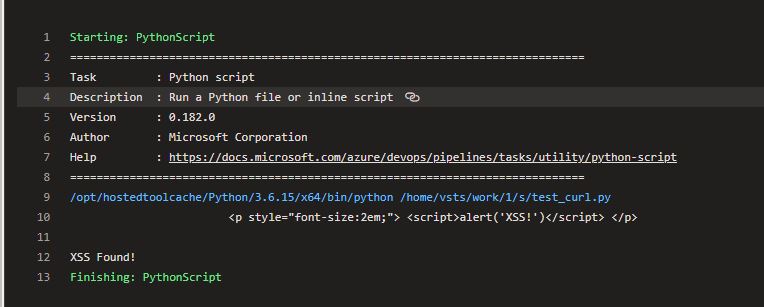
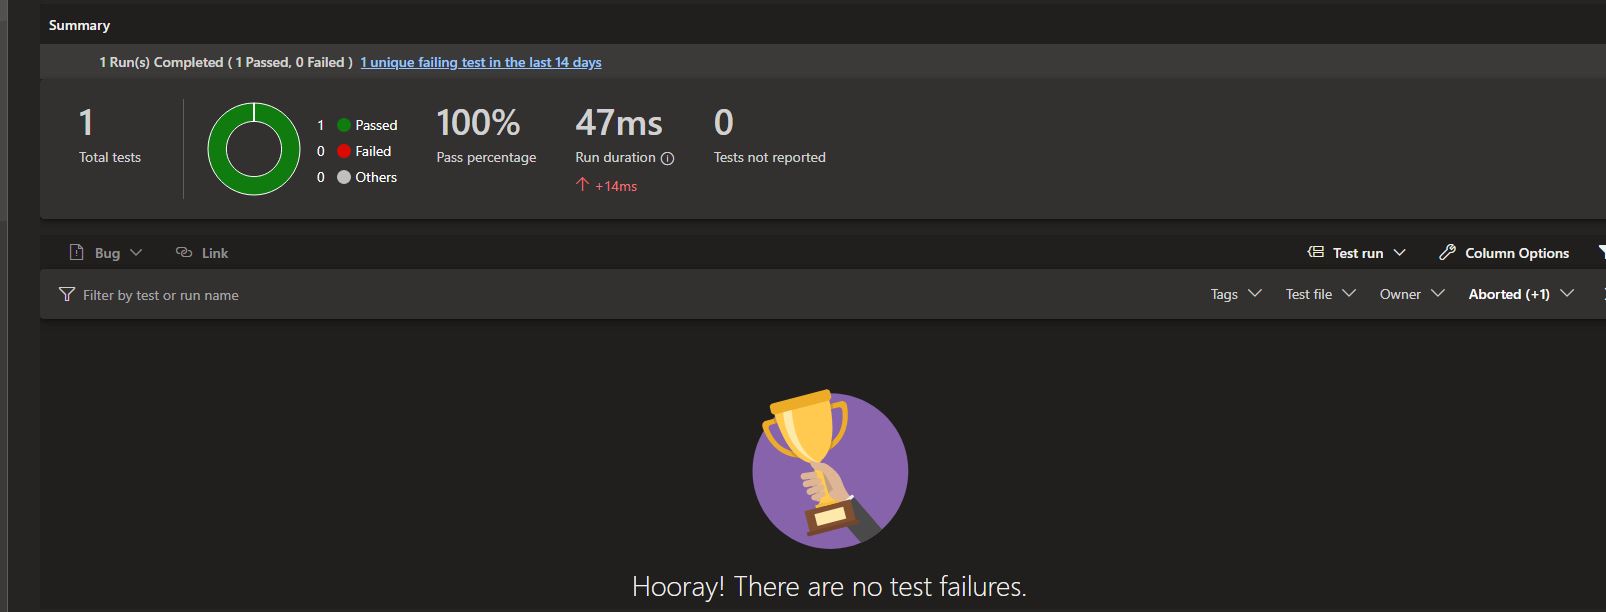
After fixing the vulnerability (by deleting the code), I am able to get a successful passed test case:
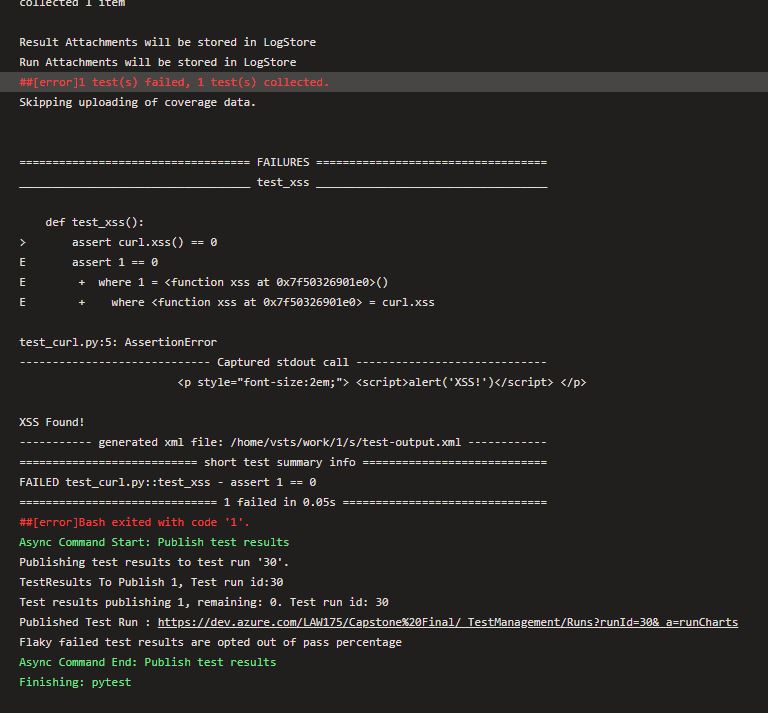
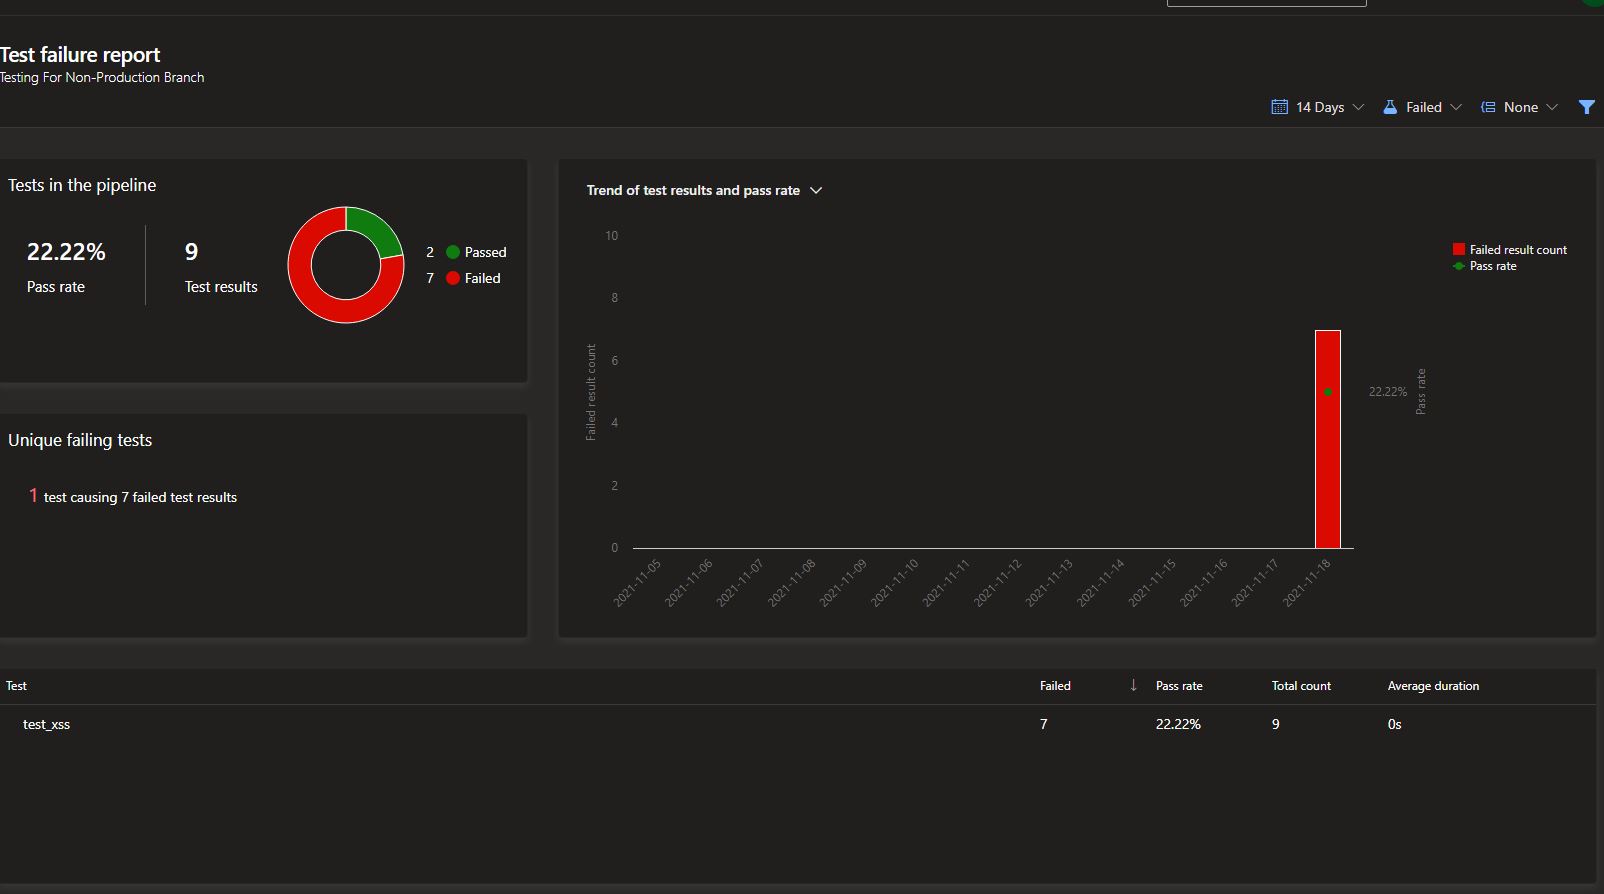
I can also see metrics on how many tests pass on my pipeline:
I hope to include code coverage by the next blog post. With that, here is my current code for my Testing Branch:
 1trigger:
 2  branches:
 3    include:
 4      - "*"
 5    exclude:
 6      - main
 7
 8variables:
 9  buildConfiguration: "Test"
10  webRepository: "capstonefinal"
11  tag: "$(Build.BuildId)"
12
13stages:
14  - stage: "Test"
15    displayName: "Testing"
16    jobs:
17      - job: "Test"
18        displayName: "Generic_Tests"
19        pool:
20          vmImage: "ubuntu-latest"
21        steps:
22          - task: CmdLine@2
23            displayName: hadolint
24            inputs:
25              script: "cat $(Build.SourcesDirectory)/Dockerfile | docker run --rm -i -v $(Build.SourcesDirectory)/hadolint.yaml:/.config/hadolint.yaml hadolint/hadolint > $(Build.ArtifactStagingDirectory)/output.txt && cat $(Build.SourcesDirectory)/Dockerfile | docker run --rm -i -v $(Build.SourcesDirectory)/hadolint.yaml:/.config/hadolint.yaml hadolint/hadolint"
26              workingDirectory: "$(Build.SourcesDirectory)"
27            continueOnError: true
28
29          - task: WhiteSource@21
30            inputs:
31              projectName: "CapstoneFinal"
32          - task: PublishPipelineArtifact@1
33            inputs:
34              targetPath: $(Build.ArtifactStagingDirectory)
35              artifactName: hadolintOutput
36
37      - job: "Python_Tests"
38        displayName: "Test Python"
39        pool:
40          vmImage: "ubuntu-latest"
41        steps:
42          - task: UsePythonVersion@0
43            inputs:
44              versionSpec: "3.6"
45          - task: Docker@2
46            displayName: "Build and push the image to container registry"
47            inputs:
48              command: buildAndPush
49              buildContext: $(Build.Repository.LocalPath)
50              repository: thylaw/flasktest
51              dockerfile: "$(Build.SourcesDirectory)/Dockerfile"
52              containerRegistry: "DockerHub Registry Connection"
53              tags: |
54                                $(tag)
55
56          - script: |
57                            sudo apt-get install libcurl4-openssl-dev
58            displayName: "Install Linux Packages"
59
60          - script: |
61                            pip install --upgrade pycurl pytest pytest-azurepipelines bandit
62            displayName: "Install Python Dependencies"
63          - task: CmdLine@2
64            displayName: Run Docker Container
65            inputs:
66              script: "docker run -d -p 5000:5000 --name flaskcontainer thylaw/flasktest:$(build.buildId)"
67              workingDirectory: "$(Build.SourcesDirectory)"
68            continueOnError: true
69
70          - script: |
71                            python -m pytest test_curl.py
72            displayName: "pytest"
73            continueOnError: true
74          - task: CmdLine@2
75            displayName: Get Curl Data
76            inputs:
77              script: "curl http://localhost:5000 > $(Build.ArtifactStagingDirectory)/curl.txt && curl http://localhost:5000 "
78              workingDirectory: "$(Build.SourcesDirectory)"
79            continueOnError: true
80
81          - script: |
82              python -m pip install flake8
83              flake8 . | tee $(Build.ArtifactStagingDirectory)/flake8output.txt
84            displayName: "Run Flake8 Test"
85            continueOnError: true
86          - script: |
87                            bandit -r $(Build.SourcesDirectory)/app.py -f json | tee $(Build.ArtifactStagingDirectory)/bandit-output.json
88            displayName: "Bandit Test"
89          - task: PublishPipelineArtifact@1
90            inputs:
91              targetPath: $(Build.ArtifactStagingDirectory)
92              artifactName: pythonoutput
How I May Improve
This task is rather lengthy, and I would prefer to have higher speeds for testing times. The only reasonable thing I can think of doing right now is to create my own Azure Agent where I can install and keep everything locally between runs including libcurl, pycurl, and my built Docker images. This would also be good for giving more data to my Datadog Monitoring Service, but this is on the lower-end of my priority queue.
Conclusion
In conclusion, I have learned a lot about how unit tests work and how to implement them into the pipeline. With this staging point, I can write a lot more tests and I plan to write at least a few test ones to show more "depth." I am very excited for this next week as I have tons of SAST and DAST tools I want to check out and implement into my pipeline!